Zuppa Tuscano
1 Ib Ground Italian Sausage
1 ½ tsp. Crushed Red Peppers
1 Large diced White onion
4 tbl. Bacon pieces
2 tsp. Garlic puree
10 cups water
5 Cubes chicken bullion
1 cup Heavy Cream
1 Ib Sliced russet potatoes, or about 3 large potatoes
¼ Bunch of Kale
1.Sautee Italian sausage and crushed red pepper in pot. Drain excess fat. Refrigerate while you prepare other ingredients.
2.In same pan Sautee bacon, onion and garlic for app. 15 minutes or until onions are soft.
3.Mix together chicken bullion and water, then add to onion, bacon and galic. Cook until boiling.
4.Add potatoes and cook until soft, about 30 minutes.
5.Add heavy cream and cook until thoroughly heated. Stir in sausage and add kale just before serving.
Greg and I don’t like this too spicy so we either use Italian sausage and no red pepper, or use regular sausage and red pepper. Use a big Sautee pan.
This is so yummy and perfect for a cold day. Also good with garlic bread sticks (like Olive Garden).
Monday, December 7, 2009
Sunday, November 29, 2009
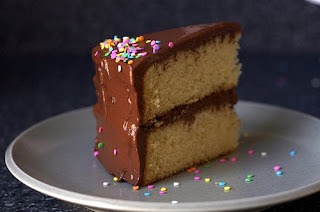
Yellow Layer Cake with Chocolate Sour Cream Frosting
Best Yellow Layer Cake
Yield: Two 9-inch round, 2-inch tall cake layers, and, in theory, 22 to 24 cupcakes, two 8-inch squares or a 9×13 single-layer cake
4 cups plus 2 tablespoons cake flour (not self-rising)
2 teaspoons baking powder
1 1/2 teaspoons baking soda
1 teaspoon salt
2 sticks (1 cup) unsalted butter, softened
2 cups sugar
2 teaspoons pure vanilla extract
4 large eggs, at room temperature
2 cups buttermilk, well-shaken
Preheat oven to 350°F. Butter two 9-inch round cake pans and line with circles of parchment paper, then butter parchment. (Alternately, you can use a cooking spray, either with just butter or butter and flour to speed this process up.)
Sift together flour, baking powder, baking soda, and salt in a medium bowl. In a large mixing bowl, beat butter and sugar in a large bowl with an electric mixer at medium speed until pale and fluffy, then beat in vanilla. Add eggs 1 at a time, beating well and scraping down the bowl after each addition. At low speed, beat in buttermilk until just combined (mixture will look curdled). Add flour mixture in three batches, mixing until each addition is just incorporated.
Spread batter evenly in cake pan, then rap pan on counter several times to eliminate air bubbles. Bake until golden and a wooden pick inserted in center of cake comes out clean, 35 to 40 minutes. Cool in pan on a rack 10 minutes, then run a knife around edge of pan. Invert onto rack and discard parchment, then cool completely, about 1 hour.
Chocolate Sour Cream Frosting
Cooking note: Be sure that your sour cream is at room temperature before you make the frosting. Using cold sour cream will result in the chocolate seizing a little, leaving little bits (like chocolate chips!) throughout the frosting.
Makes 5 cups of frosting, or enough to frost and fill a two layer 9-inch cake
15 ounces semisweet or bittersweet chocolate, chopped
2 1/4 cups sour cream, at room temperature
1/4 to 1/2 cup light corn syrup
3/4 teaspoon vanilla extract
Melt the chocolate in the top of a double-boiler or in a heatproof bowl over simmering water. Stir until the chocolate is melted. (Alternately, you can melt the chocolate in a microwave for 30 seconds, stirring well, and then heating in 15 second increments, stirring between each, until the chocolate is melted.) Remove from heat and let chocolate cool until tepid.
Whisk together the sour cream, 1/4 cup of the corn syrup and vanilla extract until combined. Add the tepid chocolate slowly and stir quickly until the mixture is uniform. Taste for sweetness, and if needed, add additional corn syrup in one tablespoon increments until desired level of sweetness is achieved.
Let cool in the refrigerator until the frosting is a spreadable consistency. This should not take more than 30 minutes. Should the frosting become too thick or stiff, just leave it out until it softens again. However, I found that the frosting didn't seem to thicken up very well at all and was more runny than I expected.
Thursday, November 26, 2009
Gullivers Corn

This is another MUST HAVE for my Thanksgiving and Christmas feast. A family favorite. If all you know of creamed corn is the gross canned kind, give this a try. It is AMAZING. I promise everyone will ask for it every holiday. Believe me. When I show up to a celebration people are looking at me to make sure I've got this in tow. ;)
20 ounces frozen corn
8 ounces whipping cream
4 ounces whole milk
1 teaspoon salt
6 tablespoons sugar
1 pinch of white pepper
2 tablespoons butter
2 tablespoons flour
Combine all ingredients EXCEPT butter and flour in a stockpot and bring to a boil. Once boiling, turn to low and simmer for 5 minutes. In another (small) pot, melt butter and add flour. Add butter/flour mixture to corn and mix well. Remove from heat and serve.
Wednesday, November 25, 2009
Grandma Paul's Yams

This is the most delicious recipe for doing your Thanksgiving Yams or Sweet Potatoes or whatever you prefer. Me? I prefer yams for their color...and I think that the color means that they are better for you. As for the way it tastes, you can't go wrong with either.
For this recipe there are two parts. There's the potato part which ultimately ends up with mashed potatoes. The second part is the candied pecan topping. This is what really makes the dish deliciousness.
I have to give the credit to my Grandma Paul for this one. She makes it every year and I can't celebrate a Thanksgiving or Christmas without it! I'm pretty sure my sisters feel the same! And since it's Thanksgiving I'd like to give my 'Thanks' to my handsome hubby and darling children. Everything else pales in comparison to them.
I ask that you read the entire recipe through before you begin. There are two parts here so you need to make sure you have ALL of the ingredients.
Preheat the oven at 350 degrees.
The yam/sweet potato mixture:
2 lbs yams or sweet potatoes
1/2 cup light brown sugar
1/2 cup butter
2 eggs, lightly beaten
1/3 cup milk
1 teaspoon vanilla
The pecan topping:
8 ounces (1 cup) chopped pecans
2/3 cup brown sugar
1/2 cup flour
1/3 cup melted butter
Peel sweet potatoes or yams and cut into 1 inch cubes. Put the sweet potatoes or yams in a stockpot of water until it comes to a boil. When it comes to a boil turn it to low and simmer for 30 minutes. Drain, mash and let stand for 15 minutes.
Combine yams/potatoes with the brown sugar, butter, eggs, milk and vanilla until smooth. Spread into an 8 X 8 baking dish.
In a separate bowl, combine pecans, brown sugar flour and butter. Spread over the top of the yams/potatoes.
Bake for 45 minutes.
Sunday, November 22, 2009
Cranberry Pudding Cake
1 c sugar
2 c flour
3 tsp baking powder
1 c evaporated milk
Pinch of salt
3 TBS melted butter or margarine
Mix & add 2 cups washed cranberries.
Place in 9x13 pan.
Cook @ 350’ until light brown.
Test w toothpick.
Remove from oven and cool.
Sauce:
1 c sugar
½ c evaporated milk
½ c butter
1 tsp vanilla
Place all ingredients in sauce pan, boil. Remove when it starts boiling.
Friday, November 20, 2009
Grandma's Brisket Recipe
Ingredients-
Brisket
Brown Sugar
2 PK Lipton’s Onion Soup Mix
2 Bottles Heinz Chili Sauce
1 onion, sliced
First rub a little brown sugar on the brisket.
Cover the brisket with 1 packet of onion soup mix.
Cover it with one bottle of chili sauce.
Layer on about half of the sliced onion.
Sprinkle the 2nd packet of onion soup mix over top.
Cover it with the 2nd bottle of chili sauce.
Layer on the sliced onions.
(you have 2 layers of the same stuff happening here)
Cook in a crock pot on low for approximately 6 hours. I believe you can also cook it in the oven around 300' for 6 hours, make sure it is covered but I really like making it in the crock pot. It never dries out that way.
Note: The sauce makes for excellent gravy!

Friday, November 6, 2009
Zucchini Ricotta Cheesecake
I've been on a bit of a squash kick lately... Roasted Butternut Squash Bisque, Stuffed Acorn Squash and Wild Rice, Zucchini Spuma, Parmesan Spaghetti Squash, and the list goes on. I guess that's just what happens as the leaves change colors and the weather starts turning colder.
Well during this spree, I have discovered what may well be my favorite new squash recipe, featuring the Italian squash.... Zucchini!
Now, this is not a dessert, so don't let the words "zucchini" and "cheesecake" in the title gross you out. This is seriously amazing! Ben and I made this recently with some friends, served with Sage Pork Chops with Caramelized Onions and a yummy salad and it was a big hit. I found the recipe on the 101 cookbooks website and, due to lack of ingredients when I decided to make it, improvised a little bit. I am, however, giving you the original recipe.
Bon Appetit!
Zucchini Ricotta Cheesecake
To shred the zucchini use a box grater - most micro planes are too fine, you want shredded zucchini, not mush. Feel free to play around with the "add-in" ingredients - for example, use whatever chopped herbs you like. I had dill on hand, and I like how it tastes with summer squash, so dill it was. I suspect anything from chopped olives, sun-dried tomatoes, or chives, to spices, chopped spinach, or corn could work here. Also, when I have the time and inclination I'll drain the ricotta through cheesecloth to get even more moisture out of the cake, but to be honest, most times I won't bother. Lastly, I use a springform pan here, but you could use an equivalent baking dish or deep tart pan as well.
2 cups zucchini, unpeeled & grated
1 teaspoon fine grain sea salt
2 1/2 cups ricotta cheese
1/2 cup freshly shredded Parmesan cheese
2 shallots, chopped
2 cloves garlic, chopped
1/4 cup fresh dill, chopped
zest of one lemon
2 large eggs, well beaten
1/3 cup goat cheese, crumbled
drizzle of olive oil
Preheat oven to 325F degrees, racks the middle. Butter/oil a 7-inch springform pan.
In a strainer, toss the shredded zucchini with the salt and let sit for ten minutes. Now aggressively squeeze and press out as much moisture as you can. Set aside.
In the meantime, combine the ricotta cheese, Parmesan cheese, shallots, garlic, dill and lemon zest in a medium bowl. Stir in the eggs and continue mixing until well combined. Now stir in the shredded zucchini. Fill the springform pan with the ricotta mixture and place on a baking sheet. Place in the oven and bake for sixty minutes. If there is any moisture left on top of the cake at this point, carefully use a bit of paper towel to dab it off. Now sprinkle with the goat cheese and return to the oven for another 20 -30 minutes or until the goat cheese is melted and the cake barely jiggles in the center (it will set up more as it cools).
At this point, if the cake is baked and set, but the top isn't quite  golden, I'll zap it with the broiler (just about a minute) to get a bit more color on top. Remove from the oven and let cool five minutes, then release the cake from its pan. Cool completely, serve at room temperature drizzled with a bit of olive oil and a few sprigs of dill.
Serves 8.
Benihana's Salad Dressing
Yum, I love Benihana's Ginger salad dressing. So Greg’s been ordering Benihana's when he stays late at work, and I'm obsessed with the salad dressing its so good.
So I went online and found this recipe that claims to be from the restaurant, and well it’s pretty darn good. Let me know what you think.
Benihana’s ginger Salad
3/4 cup Chopped onion
3/4 cup Peanut oil
6 tablespoons Rice wine vinegar
6 tablespoons Water
3 tablespoons Fresh chopped ginger root
3 tablespoons Chopped celery
3 tablespoons Soy sauce
4 1/2 teaspoon Tomato paste
4 1/2 teaspoon Sugar
4 teaspoons Lemon juice salt and pepper to taste
Combine all ingredients in a blender or food processor and process until very smooth. Makes enough to fill a tupperware squeeze bottle. Refridgerate. Note...I found the 3 Tablespoons of fresh ginger root to be a little hot, so you might try using the chopped ginger in a jar because it is a little milder than the fresh. Also, you can add a little more soy sauce if you would like! It has the best flavor after it has been refrigerated a day or two.
Friday, October 30, 2009
Artichoke Dip (for non-mayonnaisers)
I love artichoke dip, but the only food I hate in this world is mayonnaise (it is nasty but I must admit it can enhance things sometimes). I played with a few until I found the perfect dip with minimal mayo! Its not very scientific, but I've gotten excellent reviews from friends-- and actually it's even better the next day with some crusty bread, YUM!

I found this recipe on the Food Network but tweaked it a bit and included my adjustments first:
First I doubled the recipe. I used a jar of artichoke hearts and quartered them instead of frozen artichokes. Oh, and after I cooked the spinach I spent a while making sure it was COMPLETELY drained because otherwise I think it would make it kind of soupy and gross otherwise (other people in the reviews complained it was soupy and I think that is why). Also I skipped the red pepper flakes, and used fresh crushed garlic instead of the powder. I topped with Parmesan which I really liked to do-- the more cheese the better, right?Oh and then I baked it on 375 somewhere between 10 and 20 minutes, not exactly sure (keep an eye on it, but long enough for cheese to look all delicious).
Ingredients
- 1 cup thawed, chopped frozen spinach
- 11/2 cups thawed, chopped frozen artichoke hearts (you can chop, but the chunks are the best part!)
- 6 ounces good cream cheese

- 1/4 cup sour cream
- 1/4 cup mayonnaise (I probably used less, and only used it to cut the taste of the sour cream. I actually used low-fat too because I think its less offensive than the full fat stuff)
- 1/3 cup grated Parmesan (I probably used like 3/4 c. instead, ha)
- 1/2 teaspoon red pepper flakes (omitted)
- 1/4 teaspoon salt
- 1/4 teaspoon garlic powder (fresh crushed sub)
Directions
Boil spinach and artichokes in 1 cup of water until tender and drain. Discard liquid. Heat cream cheese in microwave for 1 minute or until hot and soft. Stir in rest of ingredients and serve hot.
Thursday, October 29, 2009
Chicken Piccata (by the Barefoot Contessa)
In honor of my cute cousins coming to dinner tonight, I am making Chicken Piccata. Ambyr shared this recipe with me and it quickly became a favorite in our home. Enjoy.
Chicken Piccata
4 split (2 whole) boneless, skinless chicken breasts
kosher salt and freshly ground black pepper
1 cup all-purpose flour
2 extra large eggs
1 1/2 seasoned (or plain) dried breadcrumbs
good olive oil
3 tablespoons unsalted butter, at room temperature
1/3 cup freshly squeezed lemon juice (2 lemons), lemon halves reserved
1/2 cup dry white wine
sliced lemon, for serving (I don't do this...)
chopped fresh parsley, for serving (I do do this;)
Preheat oven to 400 degrees. Line a sheet pan with parchment paper.
Place each chicken breast between 2 sheets of parchment paper or plastic wrap and pound it out to 1/4-inch thick. Sprinkle both sides with salt and pepper.
Mix the flour, 1 teaspoon salt and 1/2 teaspoon pepper on a shallow plate. In a second plate, beat the eggs and 1 tablespoon water together. Place the bread crumbs on a third plate. Dip each chicken breast first in the flour, shake off the excess, and then dip in the egg and bread-crumb mixtures.
Heat 2 tablespoons olive oil in a large saute pan over medium to medium-low heat. Add 2 chicken breasts and cook for 2 minutes on each side, until browned. Place them on the parchment paper covered sheet pan while you cook the rest of the chicken. Heat more olive oil in the saute pan and cook the second 2 chicken breasts. Place them on the same sheet pan and allow them to bake for 5-10 minutes while you make the sauce.
For the sauce, wipe out the saute pan with a dry paper towel. On medium heat, melt 1 tablespoon of the butter and then add the lemon juice, white wine, the reserved lemon halves, 1/2 teaspoon salt, and 1/4 teaspoon pepper. Boil over high heat until reduced by half, about 2 minutes. Off the heat, add the remaining 2 tablespoons of butter and swirl to combine. Discard the lemon halves. Serve one chicken breast on each plate, spoon on the sauce, and serve with sliced lemon and a sprinkling of fresh parsley.
Thursday, October 22, 2009
Cooking/Baking tip
Read through your recipe once or twice before you begin to cook or bake. Sometimes recipes will say something like mix batter, making sure not to over mix. The cook or baker will stop at mix without reading on and then realize they may have over mixed.
Monday, October 12, 2009
A lesson in compromise
The other night, while trying to come up with yet another last minute dinner idea, Ben decided that he wanted waffles for dinner, but I was craving something more along the lines of a caramelized onion quiche. While flipping through my [many] cookbooks for the perfect waffle recipe, we both definitely found what we were looking for, albeit was somewhat unusual.
Husband's review: To review this recipe is like being asked to review what you thought about toilets and indoor plumbing when you were potty training; I was skeptical at first but I eventually came to love the wonder of seeing that water disappear to Neverland, or wherever it goes (just ask Luke, he knows what I'm talking about). I was hungry and I wanted my sweet, buttery, sugar filled waffles, and I wasn't going to hear it any other way. But, due to my kindness (and the fact that Allyson can beat me up), I allowed my wife a savory alternative. However, when she said onions and waffles in the same sentence, and kept a straight face, I thought I was going to bed hungry (Heather, stop laughing, sometimes I DON'T eat everything in sight). This being the case, you could imagine my surprise when she busts out with the most appetizing waffle I've ever seen without whipped cream, sugar or maple syrup af any kind. So, with that in mind, I challenge all of you to slap Aunt Jamima out of the way, cool your Canadian maple loving tendencies, and hold on to your butts as you try these savory grids of goodness. You're gonna like the way it tastes, I guarantee it. But you don't have to take my word for it, because now you know, and knowing is half the battle. Now you have a friend in the waffle business. (4 points if you can name all 4 of the sources of the quotes used)
I guess I should say that to me, cooking is more than a necessity or even a hobby. Cooking is a passion, I'm even tempted to say that to me, cooking is life. I think I scare Ben a little every once in a while, when I suggest something out of the ordinary. So, on top of my passion for cooking, I love cookbooks. Although I'm rather picky about which cookbooks I buy, I have cookbooks for anything and everything, from all over the world. Yes, in fact, I actually read them in my spare time. I'll attribute this recipe to possibly one of my favorite cookbooks, Michael Bauer's "The Secrets of Success Cookbook; Signature Recipes and Insider Tips from San Francisco's Best Restaurants"
So without further ado, here's the long awaited recipe for caramelized onion waffles and lemon cream. The perfect combination of savory with a hint of tang and even the slightest kick. Something unexpected, but combines to create a perfect symphony of flavors.
Caramelized Onion Waffles and Lemon Cream
Waffles
3 Tbsp butter
2 medium yellow onion, finely diced
2 c all-purpose flour
1/2 c chopped fresh mixed herbs (such as parsley, thyme, chives, tarragon, and chervil) [I used 1 1/2 Tbsp mixed dried herbs - parsley, thyme, and tarragon]
1 Tbsp ground black pepper
1 tsp salt
1 1/2 c milk
2 eggs at room temperature
1/3 c melted butter
Vegetable oil for greasing
**optional, 1/4 pound thinly sliced smoked salmon or gravlax
- Melt the 3 Tbsp butter in a large skillet over medium heat. Add the onions and saute until golden and caramelized, about 10 minutes. Set aside to cool.
- In a large bowl, combine the flour, herbs, baking powder, pepper, and salt. In a separate bowl, combine the milk, eggs, and melted butter. Fold the wet ingredients into the dry ingredients, being careful not to overmix. Fold in the caramelized onions. The batter should be thick and slightly lumpy.
- Heat a waffle iron according to the manufacturer's instructions and brush the grill lightly with vegetable oil. Cook the waffles until golden brown, about 3 to 5 minutes. Brush the grill with oil between each waffle. Serve, topped with lemon cream.
**Optional: Place a waffle in the center of each plate and drape salmon on the waffles around the edges. Drizzle with lemon cream.
Lemon Cream
1 c sour cream
1/4 c whole milk
Zest of one lemon
3 Tbsp fresh lemon juice
- Wisk the sour cream, milk, lemon zest, and lemon juice in a small bowl to blend. Refrigerate until ready to use.

Sunday, September 27, 2009
Turkey and Spinach Lasagna

I have to admit, I have never really loved lasagna...sorry but it's true. I always knew it could be good. Well with this twist on the traditional dish I believe it is good. Forget ricotta and mozzarella. I want flavor! I have gotten nothing but rave reviews on this one. I promise you will fall in love with this recipe. It's easy and pretty quick.
Ingredients:
1 ½ lbs ground turkey
4 small 8 ounce cans tomato sauce (I use Hunts brand; two regular, two garlic flavored.)
8 ounces lasagna noodles
6 ounces cream cheese, softened
8 ounces sour cream
2 cups shredded extra sharp white cheddar
1 bag of spinach
Instruction:
Boil lasagna noodles and drain.
Saute spinach in olive oil. Drain excess juice and oil.
Brown turkey.
Combine spinach and turkey in a large bowl. Add tomato sauce and mix together.
In a separate bowl, combine cream cheese and sour cream.
Layer in 9x13 baking dish:
layer all of the noodles on the bottom of the casserole dish
½ turkey/spinach/tomato sauce mixture
cream cheese/sour cream mixture
½ turkey/spinach/tomato sauce mixture
sprinkle cheese on top
Bake uncovered at 350 degree for 30 minutes.
Let sit 5-10 minutes after removing from oven before serving.
Saturday, September 26, 2009
Shower Food

I threw a fall themed shower for a dear friend of mine, Molly. She is due with her little guy, Griffin, October 25 and we all couldn't be more excited! To celebrate his arrival we threw a couples baby shower-- fall themed to usher in the seasonal excitement in the most festive way possible!
Food-wise I obviously thought about butternut squash-- what could be more fall-ish?! Initially I planned on doing a soup, but I actually figured with this crowd a salad would be even better-- it did not disappoint!
Butternut Squash Salad With Apple Cider Dressing
- 1 (1 1/2-pound) butternut squash, peeled and diced
- Good olive oil
- 1 tablespoon pure maple syrup (real stuff!)
- salt
- handful of dried cranberries
- approximately 3/4 cup apple cider or apple juice
- approximately 2 tablespoons cider vinegar
- approximately 2 teaspoons Dijon mustard
- 4 ounces baby arugula, spring mix or whatever leafy greens, washed and spun dry
- 1/2 cup walnuts halves, toasted or glazed
- (I also think a handful of pomegranate seeds would be awesome)
Directions
Preheat the oven to 400 degrees F.
Place the butternut squash on a sheet pan and make sure chunks aren't too big. Toss with olive oil, the maple syrup, and salt. Roast the squash for 15 to 20 minutes, turning once, until tender. Add the cranberries to the pan for the last 5 minutes.
While the squash is roasting, combine the apple cider, vinegar, in a small saucepan and bring to a boil over medium-high heat. Cook for 6 to 8 minutes, until the cider is reduced to about 1/4 cup. Off the heat, whisk in the mustard, olive oil, and salt. ** This is what the formal recipe calls for-- I just eyeballed and added apple juice, apple cider vinegar, dijon, salt, and olive oil, mixed it and tasted until I liked the flavor. No boiling or anything, turned out delicious.
Place the lettuce in a large salad bowl and spoon just enough vinaigrette over the salad to moisten and toss well. Add the roasted squash mixture, the walnuts, and the grated Parmesan (if desired). Sprinkle with pomegranate seeds if desired.
Enjoy!
Wednesday, September 16, 2009
Gouda Mac N Cheese
A spin on the Barefoot Contessa classic. Mac and Cheese is a staple in my home-- but we don't use the blue box around here. Thats like saying a bad word. (And it really is easy to make-- it just seems like a long recipe, but really its just because I am long winded...)

I like to make my mac n cheese from scratch-- so much better and soooo worth it! Originally I started experimenting with it when I tried Ina Garten's gruyere and cheddar macaroni and cheese, but now I toss in different cheese and try out texture changes with different noodles. Its really fun to come up with concoctions that really seem to work. I just finished making a gouda and white sharp cheddar mac and cheese and I have never been more pleased with the outcome. The great thing is that most of this stuff you always have around the house, with the exception of the gouda. Bear with me as I usually do everything to taste (measuring just means more dishes)! Also, this recipe is how much I make for just Adam and I and maybe one guest, double it for a bigger crowd.
A few tablespoons of flour (maybe 2 or 3 )
A few tablespoons of butter (equal to the amount of flour plus another 1 or 2 for breadcrumbs)
about 1 c. hot milk
1 c. white sharp cheddar (thats a really rough guess-- just keep adding until it tastes amazing-- same with the gouda)
1/2 c. to 1 c. gouda (and if you aren't a gouda person, try something else like gruyere or just double the cheddar)
a few cups of noodles (often I do macaroni, but if we have guests I use cavatappi because its so pretty, but sometimes hard to find at the store-- but use what you like! Penne, rotini, whatever)
about 1 c. bread crumbs (can use panko or make your own in the food processor from white bread)
2 roma tomatoes (optional)
salt
Throw the noodles in a pot of boiling water and cook according to directions on box. While noodles are cooking I work on the cheese sauce:
I start by making a roux and which I turn into a bechamel. This sounds really exciting because its fun french cooking terms, but its pretty basic-- mix one part fat with one part thickening agent over heat= a roux, and once you add the hot milk its a bechamel sauce. I like to use a couple tablespoons of butter and a couple tablespoons of flour. Cook over heat for about a minute. You want them to mix together and still be a little loose-- if they clump together add a little more butter, if it's super runny add a little more flour. After the minute, add the hot milk. Keep stirring over heat until you see the very cool transformation of runny milk to a beautiful rich and creamy milk substance. At this point you can remove from the heat and throw in the grated cheeses. Mix them well-- the hot milky sauce should melt the cheese pretty easily. Salt to taste.
Drain noodles and immediately add them to the cheese sauce. For my lunch-- I usually just stop here and toss a couple sliced tomatoes on top and call it a day (I like mine gooey and cheesy but baking it, which Adam prefers, will firm that up a little). For guests, I put it in a baking dish. If I have tomato eaters, I slice a roma tomato really really thin and do a single layer of that over the top with a tiny bit more salt to bring out the flavor of the tomatoes--if not I skip it. I mix bread crumbs with enough melted butter to moisten them (1 or 2 tblspns) and then evenly distribute over the macaroni and tomatoes. I bake it on 400 for about 20 minutes or until the breadcrumbs get all golden and crunchy.
Make sure you eat it hot otherwise the breadcrumbs will turn from an awesome crunch to a soggy mess. This dish is a crowd pleaser for sure and I am loving the discovery of the gouda addition. You will never be sad about making this deliciousness.
Enjoy!
Saturday, September 12, 2009
AMBYR CASSEROLE
INGREDIENTS
- 4 skinless, boneless chicken breast halves
- 1 pound broccoli florets, cooked
- 1 can condensed cream of chicken soup
- 2 scoops of mayonnaise
- 1 squeeze of Lemon Juice
- 1 cup shredded Cheddar cheese
- Preheat oven to 350' degrees F (175 degrees C).
- Bake chicken until tender and shred into bite size pieces.
- Steam broccoli until crisp but tender.
- In a small bowl mix together the soup, mayonnaise, and one squeeze of lemon juice.
- In a 9x13 inch baking dish layer the chicken, broccoli, soup mixture, and cheese.
- Bake in oven for 25-30 minutes.
Monday, September 7, 2009
Artichoke Dip
INGREDIENTS
- 2 (6.5 ounce) jars marinated artichoke hearts, drained and chopped
- 1 cup mayonnaise
- 1 cup grated Parmesan cheese
- 1 (4 ounce) can diced green chile peppers, drained
DIRECTIONS
- Preheat oven to 350 degrees F (175 degrees C).
- In a medium bowl, mix together the artichoke hearts, mayonnaise, Parmesan cheese and chile peppers. Transfer the mixture to a 9x9 inch baking dish.
- Bake in the preheated oven 20 to 25 minutes, or until lightly browned

Tuesday, September 1, 2009
Fried Ice Cream
I like to think that I can just randomly make things taste good regardless of how much of something I am supposed to add. Kind of dumb, but usually my results are pretty good anyway. The problem is I don't know how to recreate these inventions on a foodie blog.
This recipe was stolen from my friend Molly. Its good. I didn't pay attention to measurements-- but its dessert, people! Just add however much tastes delicious!
All you need is:
either Frosted Flakes or Corn Flakes
Cinnamon
Sugar
Vanilla Ice Cream (I guess you can actually do whatever you want, but its good with vanilla, especially with the chocolate sauce I will post next!)
sprinkle in plenty of cinnamon and sugar and toss in a bunch of Corn/Frosted Flakes in a medium mixing bowl. Mix and smash so the pieces of cereal are little and broken.
(get ready to get messy!) Take about a cup of Ice Cream (use a scoop, spoon, whatever, but your hands are going to get nasty anyway so you might as well use those-- and please make sure they are clean!) and mold it into a ball with your hands. Toss it into the cinnamon/sugar/cereal bowl and cover with yummy crunchy little flakes. Set on a piece of parchment/foil/Tupperware (anything you have will pretty much work, it doesn't really stick)
in the freezer until all the way frozen through again (about an hour).
6 people for dessert? Make 6 balls. Easy.

And I LOVE my new Anthro bowls-- they are the perfect size for this. Can't wait to have guests over to serve it in them (read: come over so I can make this again right now!!)
 Enjoy!
Don't Be Appalled...
You'll love it--but you're not going to like it! Just ignore how many ridiculous ingredients you're putting in, and keep in mind it tastes so amazing because of what you're tossing in the pot. Plus this makes so much you'll make it once and have leftovers in your freezer for the next 27 years.
Chocolate Sauce
(perfect for over the fried ice cream, as fondue for girls night, or just with a spoon! Ha)
 I drizzle about 1 or 2 tablespoons of the stuff over the fried ice cream. YUM!
Chocolate Sauce
(perfect for over the fried ice cream, as fondue for girls night, or just with a spoon! Ha)
Melt Together:
12 oz bag of chocolate chips (I like the good stuff: Ghirardelli--but use whichever you like, and I would do a double boil so I don't burn the chocolate)
1 c margarine
add alternately:
2 2/3 cup evaporated milk (although we used sweetened condensed milk on accident-- still good!)
1 lb powdered sugar
Add:
2 tsp vanilla
1 (7oz) jar marshmallow creme
Bring all ingredients to a boil; stir constantly for about 5 minutes. Makes a ton. Lasts for about 3 to 4 weeks in refrigerator and freezes well.
 I drizzle about 1 or 2 tablespoons of the stuff over the fried ice cream. YUM!
Monday, August 31, 2009
Cheese
This is just a quick tip:
Since relocating to Arizona I have noticed my cheese has been going bad faster than usual. Maybe the cheese in California is fresh and we import cheese in Arizona, which would limit the shelf life (my assumption). Our refrigerator is definitely cold enough; ask the frozen carrots and the slushy water, they’ll tell you. What I have been doing to prevent this unwanted mold is I keep my cheese in the freezer. Shredded cheese breaks apart very easily as does sliced cheddar. My cheese now keeps for a very long time and I don’t have to throw cheese away, which can get expensive. 
Since relocating to Arizona I have noticed my cheese has been going bad faster than usual. Maybe the cheese in California is fresh and we import cheese in Arizona, which would limit the shelf life (my assumption). Our refrigerator is definitely cold enough; ask the frozen carrots and the slushy water, they’ll tell you. What I have been doing to prevent this unwanted mold is I keep my cheese in the freezer. Shredded cheese breaks apart very easily as does sliced cheddar. My cheese now keeps for a very long time and I don’t have to throw cheese away, which can get expensive.
Thursday, August 27, 2009
Chicken and Broccoli Cheese Soup

INGREDIENTS:
2-3 cooked chicken breasts
4 c chicken broth
4 c broccoli (chopped into small pieces)
¾ c butter
¾ c flour
1 quart half and half
1 c shredded cheddar cheese
1. Cook 2-3 chicken breasts and chop into small pieces (boiled chicken might work well)
2. Bring 4 cups chicken broth to a boil. Add broccoli, simmer 3-5 minutes. Remove from heat.
3. White Sauce: Melt butter in a sauce pan. Whisk in flour until smooth over medium heat. Pour in half and half. Stir until it thickens, then gradually add cheese. Stir until cheese is melted.
4. Bring broccoli and broth to a simmer again and slowly pour in the white cheese sauce. Continue to stir until thickens. Add some coarse black pepper.
5. Add cooked chicken, and heat until chicken is warm again.
Tuesday, August 25, 2009
Chocolate White Chocolate Chunk Cookies
Recipe Courtesy of The Barefoot Contessa, Ina Garten


Recipe goes like this:
2 sticks unsalted butter at room temperature
1 cup light brown sugar, packed
1 cup granulated sugar
2 teaspoons pure vanilla extract
2 extra-large eggs at room temperature
2/3 cup good unsweetened cocoa powder(I like dark chocolate)
2 cups all-purpose flour
1 teaspoon baking soda
1 teaspoon kosher salt
1 1/2 pounds good white chocolate chips
Preheat oven to 350 degrees.
Cream butter and two sugar until light and fluffy in the bowl of an electric mixer fitted with the paddle attachment. Add the vanilla, then the eggs, one at a time, and mix well. Add the cocoa and mix again. Sift together the flour, baking soda, and salt and add to the chocolate with the mixer on low speed until just combined. Fold in the white chocolate chips.
Drop the dough on a baking sheet, covered in parchment paper, in rounded scoops. Dampen your hands and flatten the dough slightly. Bake for exactly 15 minutes (the cookies will seem underdone). Remove from the oven and let cool slightly on the pan, then transfer to a wire rack to cool completely.
My advice on this one:
Follow the recipe exactly as it says. Unsalted butter, room temp. items and all. The details really do make the difference.
Monday, August 24, 2009
Sweet Potato Frites with Spicy Ketchup

These make for a yummmmmy little side dish that Adam and I are now addicted to. A great way to get those good vitamins from a sweet potato without all the sugar of our Gramma's delicious holiday yam recipe. The spicy ketchup sends the fries just right over the top-- the combo is amazing.
For just Adam and I, we use one sweet potato-- but the recipe calls for 5.
Slice the potatoes into fry sized cuts-- I like mine long and skinny, some like them like steak fries, totally your preference.
Put fries in a bowl and pour a little olive oil (only enough to coat the yams) and a few pinches of salt. Toss them around until totally coated.
Lay them out on a cookie sheet in a single layer
Bake at 400 for 10-15 minutes until golden-- then pull out, flip and put back in for another 10-15 minutes.
While the fries are baking, put several tablespoons of ketchup in a small serving bowl and mix with a few splashes of Tabasco.
When the fries finish, let cool and dip in spicy ketchup. The fries should be just the right amount of crunchy, soft and chewy. The natural sweet flavor of the sweet potato with the salty olive oil coating dipped in the spicy ketchup is sooo delicious!
Enjoy!
CPK dough recipe


Makes dough for two 9-inch pizzas. We mixed by hand quadrupled the recipe and had to add a little more "yeast water" to make the dough a little more tacky. We didnt have a pizza stone or cornmeal so instead we used "pizza pans" and flour. The pizzas still turned out great.
Basic Pizza Dough:
1 teaspoon yeast
½ cup plus 1 tablespoon warm water
(105-110 degrees F)
1 ½ cups bread flour or all-purpose flour
2 teaspoons sugar
1 teaspoon salt
4 teaspoons extra virgin olive oil
To make the dough:
1. Dissolve the yeast in the water and set aside for 5 to 10 minutes. Be sure that the water is not hot; temperatures of 120° F and above will kill the yeast and the dough will not rise.
2. If using an upright electric mixer, such as a KitchenAid, use the mixing paddle attachment because the batch size is too small for the dough hook to be effective. Combine all other ingredients (except one teaspoon of olive oil) and combine them with the dissolved yeast in the mixing bowl. (Do not pour the salt directly into the yeast water because this would kill some of the yeast.) Allow these 2 ingredients to mix gradually; use the lowest 2 speeds to mix the dough. Mix for 2 to 3 minutes, until the dough is smooth and elastic. Over mixing will produce tough, rubbery dough, and friction will cause dough to rise too fast.
3. If mixing by hand, place the dry ingredients in a 4 to 6-quart mixing bowl; make a well in the middle and pour the liquids (reserving a teaspoon of olive oil). Use a wooden spoon to combine the ingredients. Once initial mixing is done, you can lightly oil your hands and begin kneading the dough; knead for 5 minutes. When done, the dough should be slightly tacky (that is, it should be barely beyond sticking to your hands).
4. Lightly oil the dough ball and the interior of a 1 quart glass bowl. Place the dough ball in the bowl and seal the bowl with clear food wrap; seal air tight. Set aside at room temperature (70-80° F) to rise until double in size; about 1 ½ to 2 hours.
5. Note: The dough could be used at this point, but it will not be that wonderful, chewy, flavorful dough that it will become later. Punch down the dough, re-form a nice round ball and return it to the same bowl; cover again with clear food wrap. Place the bowl in the refrigerator overnight covered airtight.
6. About 2 hours before you are ready to assemble your pizza, remove the dough from the refrigerator. Use a sharp knife to divide the dough into 2 equal portions (or 4 equal portions if making appetizer-sized pizza or if smaller 6-inch pizzas are desired).
7. Roll the smaller dough into round balls on a smooth, clean surface; be sure to seal any holes by pinching or rolling.
8. Place the newly formed dough balls in a glass casserole dish, spaced far apart for each to double in size. Seal the top of the dish air-tight with clear food wrap. Set aside at room temperature until the dough balls have doubled in size (about 2 hours). They should be smooth and puffy.
To stretch and form the dough for pizza:
1. Sprinkle a medium dusting of flour over a 12x12-inch clean, smooth surface. Use a metal spatula or dough scraper to carefully remove a dough ball from the glass casserole dish, being very careful to preserve its round shape. Flour the dough liberally. Place the floured dough on the floured smooth surface.
2. Use your hand or rolling pin to press the dough down forming a flat circle about 1/2-inch thick. Pinch the dough between your fingers all around the edge of the circle, forming a lip or rim that rises about 1/4-inch above the center surface of the dough. You may continue this outward stretching motion of the hands until you have reached a 9-inch diameter pizza dough.
To dress the pizza:
1. Lightly sprinkle cornmeal, semolina or flour over the surface of a wooden pizza peel. Arrange the stretched dough over the floured peel surface. Work quickly to dress the pizza so that the dough won’t become soggy or sticky from the sauces and toppings.
2. When you are ready to transfer the pizza to the pizza stone in the preheated oven, grasp the handle of the peel and execute a very small test jerk to verify that the pizza will come easily off the peel. If the dough doesn’t move freely, carefully lift the edges of the dough and try to rotate it by hand. Extreme cases may require that you toss more flour under the dough edges.
3. Once the dough is moving easily on the peel, open the oven and position the edge of the peel over the center of the stone about 2/3 from the front of the stone. Jiggle and tilt the peel to get the pizza to start sliding off. When the pizza begins to touch the stone, pull the peel quickly out from under it. Don’t attempt to move the pizza until it has begun to set (about 3 minutes). The peel can be slid under the pizza to move it or remove it.
Saturday, August 22, 2009
Cilantro Chicken
If you're looking for another way to cook all of that frozen chicken in your freezer you can always try this. It's incredibly flavorful, quick and healthy. Isn't that what we all want? Note: you must like cilantro! Apparently there are people who don't like cilantro. Crazies.


4 boneless, skinless chicken breasts
¼ cup lime juice
½ cup chopped fresh cilantro
4-6 cloves garlic
1 Tablespoon honey
1 Tablespoon olive oil
½ teaspoon salt
¼ teaspoon pepper
Mix all ingredients together and put into a Ziploc bag with chicken. Let marinate a minimum of 30 minutes or up to overnight. Grill 4-6 minutes on each side.
Wednesday, August 19, 2009
Magnolia Bakery Cupcakes :)
These are the best cupcakes of life! The Magnolia Bakery is one place I insist on visiting whenever I find myself in New York. I highly recommend the bakery in New York and if you can't get there, make these at home in the mean time.
 The cupcake:
1 1/2 cups self-rising flour
1 1/4 cups all-purpose flour
1 cup (2 sticks) unsalted butter, softened
2 cups sugar
4 large eggs, at room temperature
1 cup milk
1 teaspoon vanilla extract
Preheat oven to 350 degrees. Line two 12-cup muffin tins with cupcake papers.
In a small bowl, combine the flours. Set aside.
In a large bowl, on the medium speed of an electric mixer, cream the butter until smooth. Add the sugar gradually and beat until fluffy, about 3 minutes. Add the eggs, on at a time, beating well after each addition. Add the dry ingredients in three parts, alternating with the milk and vanilla. With each addition, beat until the ingredients are incorporated but do not over beat. Using a rubber spatula, scrape down the batter in the bowl to make sure the ingredients are well blended. Carefully spoon the batter into the cupcake liners, filling them about three-quarters full. Bake for 20-25 minutes, or until a cake tester inserted into the center of the cupcake comes out clean.
Cool the cupcakes in the tins for 15 minutes. Remove from the tins and cool completely on a wire rack before icing.
Makes about 2 dozen cupcakes (depending on the size of your cupcake papers and muffin tins).
The icing:
1 cup (2 sticks) butter, softened
6-8 cups confectioners' (powdered) sugar
1/2 cup milk
2 teaspoons vanilla extract
Place the butter in a large mixing bowl. Add 4 cups of the sugar and then the milk and vanilla. On medium speed of an electric mixer, beat until smooth and creamy, about 3-5 minutes. Gradually add the remaining sugar, 1 cup at a time, beating well after each addition (about 2 minutes), until the icing is thick enough to be of good spreading consistency. You may not need to add all of the sugar. If desired, add a few drops of food coloring and mix thoroughly. (Use and store the icing at room temperature because icing will set of chilled.) Icing can be stored in an airtight container for up to 3 days.
Makes enough for 2 dozen cupcakes.
My advice: Always follow the recipes instructions when it says "at room temp." or "softened" or "don't over beat" and the like. These little details are what make the recipe better than the rest. That and the butter...
Monday, August 17, 2009
What can I say, I LOVE muffins...
Those who know me well know I have a slight obsession with Ina Garten and her amazing recipes. Why, you might ask? Well, I've yet to make something of hers that I don't LOVE. And those who know me well know that I am an old faithful. If I find something that I like I will keep coming back for more. So, you will find a lot of Barefoot Contessa recipes from me. I'll just say it now and get it over with, you're welcome...
Tri-Berry Muffins
by Ina Garten of Barefoot Contessa at Home


3 cups all-purpose flour
1 Tablespoon baking powder
1/2 teaspoon baking soda
1/2 teaspoon kosher salt
1 1/2 tablespoons ground cinnamon
1 1/4 cups milk
2 extra-large eggs, lightly beaten
2 sticks unsalted butter, melted
1 cup fresh blueberries
1/2 cup fresh raspberries
1/2 cup diced fresh strawberries
1 1/2 cups sugar*
1 cup walnuts, chopped**
Preheat the oven to 375 degrees. Line muffin tins with paper liners.
Sift the flour, baking powder, baking soda, salt, and cinnamon together in a large bowl. Stir with your hand to be sure the ingredients are combined. In another bowl, combine the milk, eggs, and melted butter. Make a well in the middle of the dry mixture, pour the wet mixture into the well, and stir until just combined. There will be some lumps but don't over mix the batter! Add the blueberries, raspberries, strawberries and sugar and stir gently to combine.
Using a 2 1/4-inch ice cream scoop***, spoon the batter into the muffin cups and fill the liners. Bake for 20-25 minutes, until a cake tester comes out clean and the tops are nicely browned.
Makes 16-18 muffins
*It's important that you add the sugar last and don't over mix as the directions say. See the pictures above. Just trust me.
**The walnuts are my own personal upgrade to this already fab-o recipe. Walnuts are so good for you and they taste amazing in here. You can also add flax seed and other healthy stuff to feel better about all of the butter and sugar. I don't let it bother me...
***The ice cream scoop thing really makes this step easy. Invest in a good one. You will not regret it.
Enjoy!!
Sunday, August 16, 2009
Sunday Afternoon
It seems like Sunday afternoons once we get home from church we are hungry and need something delicious and easy! As I do my grocery shopping on Mondays, we are usually low on fresh stuff by Sunday-- so we have a few reliable things we always fall back on, Adams favorite it naan pizza.

I would pick up some naan bread (regular is amazing, but usually I opt for whole wheat) from Whole Foods or Trader Joes (and now I feel like most grocery stores have it too). I like the Trader Joes the best because of the shape-- perfect for individual and easily eatable pizzas!
Also I either stew some tomatoes or more often I buy a jar of good pasta sauce (Archer Farms from Target or Trader Joes brand are both great, and I prefer pasta sauce to pizza sauce for this) and pour a little one top of each piece of naan. After the sauce, I layer on some mozzarella cheese (and I would tell you amounts but its is much more effective to use your judgement than dirty a bunch of measuring cups).
Once the staples are taken care of the fun part starts. Usually Adam is happy with cheese (or maybe salami/pepperoni on top) but I try something different each time. Occasionally I crumble goat cheese with fresh basil on top, or sauté squash and zucchini and layer that on there. I have also done cooked spinach, fresh tomato slices (has to be a really good ripe tomato), mushrooms, and garlic. Yum. The bottom line is-- the options are endless.
After it is topped with all of this deliciousness, I pop it in the oven on broil. It doesn't take more than 5 minutes to cook and watch it (I check on it about every minute) because it cooks really fast! You just want the cheese to be totally melted together and maybe a little bubbly.
The naan is a great base because it is such a tender bread. Its really doughy and delicious, and the extra bonus on top of the awesome flavor is how easy and fast it is to make! I usually have all of these ingredients on hand, and I buy naan and keep it in the freezer till I am ready to use it. This takes about 5-10 minutes total to make.
Enjoy!
Tuesday, August 11, 2009
Couples Sleepover
We had a hilarious weekend full of fun, friends, and food! We had 8 friends sleep over on Friday night (a full house was a welcome change!). I loved every minute of it as we cooked up a storm and had massive amounts of girl talk as the boys had many battles of strength and stealth. A big request by the end of the weekend was the recipe for a pasta dish I made the night everyone arrived-- So easy and a yummy summer dish!
It takes about 20 minutes and is a big crowd pleaser...

Lemon Fusilli
(Courtesy of Barefoot Contessa, of course)
It takes about 20 minutes and is a big crowd pleaser...

Lemon Fusilli
(Courtesy of Barefoot Contessa, of course)
- 1 tablespoon good olive oil
- 1 tablespoon minced garlic (2 cloves)
- 2 cups heavy cream
- 3 lemons (I didn't use that much lemon because Adam doesn't love it)
- Kosher salt and freshly ground black pepper
- 1 bunch broccoli (I didn't add this)
- 1 pound dried fusilli pasta
- 1/2 pound baby arugula
- 1/2 cup freshly grated Parmesan
- 1 pint grape or cherry tomatoes, halved
Directions
Heat the olive oil in a medium saucepan over medium heat, add the garlic, and cook for 60 seconds. Add the cream, the zest from 2 lemons, the juice of 2 lemons, 2 teaspoons of salt, and 1 teaspoon of pepper. Bring to a boil, then lower the heat and simmer for 15 to 20 minutes, until it starts to thicken (but don't wait for it to get thick, that won't happen). While its thickening cook the pasta (details below)...
Meanwhile, cut the broccoli in florets and discard the stem. Cook the florets in a pot of boiling salted water for 3 to 5 minutes, until tender but still firm. Drain the broccoli and run under cold water to stop the cooking. Set aside. **I omitted the broccoli-- I don't think it needed it**
Bring a large pot of water to a boil, add 1 tablespoon of salt and the pasta, and cook according to the directions on the package, about 12 minutes, stirring occasionally. Drain the pasta in a colander and place it back into the pot. Immediately add the cream mixture and cook it over medium-low heat for 3 minutes, until most of the sauce has been absorbed in the pasta. Pour the hot pasta into a large bowl, add the arugula (the arugula will wilt from the heat), Parmesan, tomatoes, and cooked broccoli (if used). Cut the last lemon in half lengthwise, slice it 1/4-inch thick crosswise, and add it to the pasta. Toss well, season to taste, and serve hot (I didn't add the lemon slices either).
Side note: I doubled the recipe and that was more than enough for a house full of 10 people and the leftovers were still yummy the next day! Perfect to drop at someone's house as a meal-- just add a little cooked salmon, shrimp, or chicken!
Enjoy!
Enjoy!
Saturday, August 8, 2009
Peanut Butter Bar
2 Cups Chunky Peanut Butter
1 Cup Melted Butter
1 Pound Powdered Sugar (3 3/4 cups)
1 package Graham Crackers
Mix all ingredients together.
Push into bottom of a 9x13 pan.
Refrigerate.
Melt approximately 12 oz. of milk chocolate (or a mix of milk chocolate and semi-sweet!) and spread on the top. Refrigerate again.
1 Cup Melted Butter
1 Pound Powdered Sugar (3 3/4 cups)
1 package Graham Crackers
Mix all ingredients together.
Push into bottom of a 9x13 pan.
Refrigerate.
Melt approximately 12 oz. of milk chocolate (or a mix of milk chocolate and semi-sweet!) and spread on the top. Refrigerate again.
Thursday, July 30, 2009
Heather’s Yummy Rolls
If you haven't tried my garlic rolls, you are missing out. The topping is optional for those of you who are more into putting butter and honey on your rolls. Or you can do what I do and make some with the topping, and some without.
Heather’s Yummy Rolls
Dough Ingredients:
5 1/4 cups white unbleached bread flour
1/4 cup sugar
1/2 Tablespoon salt
1 1/2 rounded Tablespoon instant yeast (rapid rise)
1 1/2 Tablespoon liquid lecithin (you can find it at any health food store or sub w vegetable oil)
2 cups hot water
Garlic Topping Ingredients:
1/2 c. Butter (1 stick) Softened
1/2 c. Parmesan Cheese
Directions:
Preheat over to 350'
Mix dry ingredients.
Add lecithin(or oil) and water.
Mix for 1 minute, check consistency.
Heather’s Yummy Rolls
Dough Ingredients:
5 1/4 cups white unbleached bread flour
1/4 cup sugar
1/2 Tablespoon salt
1 1/2 rounded Tablespoon instant yeast (rapid rise)
1 1/2 Tablespoon liquid lecithin (you can find it at any health food store or sub w vegetable oil)
2 cups hot water
Garlic Topping Ingredients:
1/2 c. Butter (1 stick) Softened
1/2 c. Parmesan Cheese
1/2 c. Mayonnaise (do NOT sub with low-fat, non-fat or Miracle Whip; they are sick)
Minced Garlic, added to preference
Dried Parsley Flakes
(note: I never said this was a healthy topping)
Minced Garlic, added to preference
Dried Parsley Flakes
(note: I never said this was a healthy topping)
Directions:
Preheat over to 350'
Mix dry ingredients.
Add lecithin(or oil) and water.
Mix for 1 minute, check consistency.
If dough is too dry, add more water.
If dough is too moist, add more flour.
Mix in mixer with kneading hook for five minutes, or knead by hand for ten minutes, most of the time I do a bit of both.
Roll dough into balls about half the size you want your rolls to be.
Mix in mixer with kneading hook for five minutes, or knead by hand for ten minutes, most of the time I do a bit of both.
Roll dough into balls about half the size you want your rolls to be.
Allow dough to rise for 20 minutes.
While dough is rising, mix all topping ingredients together, less parsley flakes, in a small mixing bowl.
When dough is finished rising, scoop garlic mixture onto dough, sprinkle with parsley flakes (for aesthetics).
Bake at 350' for 10-12 minutes on the center rack of the oven; check the bottom to make sure it is a golden color.
Enjoy!
When dough is finished rising, scoop garlic mixture onto dough, sprinkle with parsley flakes (for aesthetics).
Bake at 350' for 10-12 minutes on the center rack of the oven; check the bottom to make sure it is a golden color.
Enjoy!
Tuesday, July 28, 2009
Espeecy Spicy Spaghetti
I imagine Chef Pisghetti from Curious George saying this ;-)
 This one is fast (especially if you already made the homemade sauce from my last post! Or Prego works too...) and easy but a little more fun than the old staple:
Enjoy!
 This one is fast (especially if you already made the homemade sauce from my last post! Or Prego works too...) and easy but a little more fun than the old staple:
- Coarse salt
- 1 pound pasta (use penne, bow ties, or whatever floats your boat)
- 2 cups of your favorite tomato sauce *cough cough* the one from my last post...
- 1 long red chili, cut into quarters (remove seeds if you don’t want it too spicy)
- Olive oil
- about 1/2 cup finely grated pecorino cheese (I like to use my zester for realllly fine cheese. It has a great texture)
Set a large pot of water on to boil and season with a few big pinches of salt and a little olive oil. Boil the pasta for two minutes less than the package tells you to. At the same time on another burner, heat the tomato sauce with the pieces of chili in a large frying pan over low heat to infuse the chili into the sauce. (Reserve some of boiling water from your pasta pot just in case) But drain the pasta and add it to the frying pan with the tomato sauce. Stir the pasta and sauce together with a little olive oil and let it cook on low heat for two minutes, (this is where you add a little of the reserved pasta water if you want to thin it out a little). You want the pasta to be just coated by the sauce, not swimming in it. Turn off the heat, remove the pieces of chili, stir in the pecorino and serve.
I actually also just like to cook up the sauce as it says (without adding the pasta) and pour it over angel hair pasta (fully cooked) and top it with the cheese.Enjoy!
Homemade Pasta Sauce

Pretty easy and definitely worth it... And any opportunity to use some of the leaves off of my beautiful basil plant is something I look forward to! I have experimented making my own sauce and I really like this one that I found and adapted. Its delicious-- and one of the only ones I have found that doesn't include tomato paste (which I do not like in my sauce!)!
In a large saucepan, slowly cook six cloves of thinly sliced garlic in a couple tablespoons of olive oil for five minutes over low heat. Add a couple fresh basil leaves and stir for a minute. Add two 28-ounce cans of whole, peeled tomatoes along with their juice and two more whole basil leaves. Bring the sauce to a boil, turn down the heat, season with salt and let it bubble away on low heat for 45 minutes. If the chunks are too big for you-- mash them up, chop them up, or stick it in a blender, but I love me a few steamy tomato chunks.
Cool and refrigerate.
(and to turn it into a yummy vodka sauce I want to stir in some cream cheese-- yuuuum)
This sauce is simple and pure, just the way it should be.
Yields: A LOT ;-)
Enjoy.
Make Any Italian Feast More Exciting With These...

Parmesan Crisps
The way you want it is crispy on the outside and a little chewy in the middle. Practice before you go serving this to a house full of guests-- but would be so cute in a little basket as an appetizer for a dinner party. Yum.
TIME: 5 minutes
- 1 cup coarsely grated parmesan cheese (use the biggest holes on a box grater)
Preheat the oven to 400°F
Evenly space tablespoonfuls of parmesan on a large nonstick or parchment-lined cookie sheet. Using a small spoon or your fingers, spread the parmesan so that each small pile becomes a thin circle roughly 3" in diameter. Bake for exactly five minutes or until the cheese is completely melted and bubbling and light golden brown. Be sure not to brown them too much or they will taste bitter. Let the crisps cool a minute, then slip a thin spatula or dinner knife underneath each one and remove to a rack to cool completely before serving.
1 Cup should yield about 4 servings.Enjoy.
Sunday, July 19, 2009
Homemade Tartar Sauce and Basic Baked Salmon

This is an easy one. I tried this one day as a topping for salmon and loved it. I prefer dill pickle relish as I hate the sweet taste of sweet pickle relish.
Tartar Sauce
3 tablespoons Mayonnaise
1 tablespoon of dill pickle relish
stir it up
As for preparing my salmon, I go pretty basic. But since some people (I used to be one of them) don't even know where to begin to make good salmon I'll document my process here.
Baked Salmon
Preheat oven at 450 degrees. Put salmon on a baking sheet and rub generously on both sides with olive oil. Salt and pepper to taste. Bake for 5 minutes and turn salmon over. Bake another 3-5 minutes. Top with homemade tartar sauce and serve.
I serve this to my family once a week since it is so easy and the salmon is so good for you. Try it and I bet it will become a staple in your house as well!
Tuesday, July 14, 2009
Healthy "Butter"

I love how Luke calls every kind of creamy topping "butter." It could be Ambyr's amazing tarter sauce (which you should put on here), cream cheese, or frosting. Doesn't matter, its all delicious and its all butter to him (even though tarter sauce is a far cry from frosting. Imagine getting them confused)!
Anyway, I concocted my own yummy topping, and what Luke might consider butter, and what Tyler might consider healthy sauce, I would otherwise call it Avocado Crema. I personally think it tastes better and is actually probably quite healthy (I kid you not). I usually serve it along side some yummy light fish (last night I did it with pan fried mahi-mahi, a couple weeks ago I served it with grilled Tilapia).
1/2 avocado
2 tablespoons of Greek yogurt
(I have used 0,2, and 4%-- all work fine, depends on how you like it)
juice of half a lemon
chopped fresh cilantro (optional)
salt to taste
I really mash up the avocado until it is creamy, you can whip it or mash with a fork, doesn't matter. Just make sure its not lumpy.
Add all other ingredients and mix well
(I like the thicker consistency, some may like it thinner-- in that case add a tablespoon of milk)
serves 2 big eaters (like me) or 4 nibblers (*cough* adam *cough*)
(I like the thicker consistency, some may like it thinner-- in that case add a tablespoon of milk)
serves 2 big eaters (like me) or 4 nibblers (*cough* adam *cough*)
This stuff is goooood. My husband doesn't like any kind of sauce, but he covers his fish in this stuff and devours it. Also perfect for burritos, drizzled over grilled shrimp, fish tacos, quesadillas, or even on burgers!
 Enjoy
EnjoyMonday, July 13, 2009
basil burgers

So before I became a vegetarian I ate my weight in hamburgers while living in New York. We found several burger places we loved, The best being Westville, yum! and the runner up would definitely be Shake Shack, I thought their veggie burgers were to die for. We also loved the burgers at Lovin' Cup in Williamsburg, Brookyln. Shake Shack is actually so popular there is a camera set up on their website for people to check the line before you go, and the new phenomenon this summer is people stand in line and sell their spots when they get close to the front! Kind of worth it when the wait is an hour long, which is not uncommon. Anyway, sadly I grew a little burger obsession just before I kicked the beef for good. Now I dream about them (a little creepy but true). The other night I dreamed of a burger recipe and I will need one of my meat eating friends to try it out and tell me if my suspicions are correct.
Take the ground meat and mix in some freshly chopped basil (or even homemade pesto if you're really ambitious)
Make two thin patties, and lay a chunk of goat cheese (I'm telling you, I'm obsessed with this stuff) on one patty and lay the other patty on top. Press the sides of the patties together until it is one large patty with the cheese inside.
Grill the burger
Use a Portuguese muffin as the bun.
(I'm thinking there are no necessary condiments for this yummy thing, but sautéed onions or sun-dried tomatoes would be delicious too:-)
 I dream up recipes, and I dream about this place daily. I miss living 100 yards away from this delicious and fun little neighborhood gem! Girls trip to NY anyone?!
Friday, July 10, 2009
Another cookie recipe...

Banana-Oatmeal Chocolate Chip Cookies
From Cooking Light magazine
½ Cup mashed ripe banana (about 1 medium)
½ Cup packed brown sugar
¼ Cup butter, softened
¼ Cup granulated sugar
1 teaspoon vanilla extract
1 large egg
1 ¼ Cups all-purpose flour
2 Cups old fashioned oats
1 teaspoon baking soda
½ teaspoon salt
½ cup semisweet chocolate chips
Cooking spray
1. Preheat oven to 350.
2. Combine first five ingredients in a large bowl; beat with a mixer at medium speed until smooth. Add egg; beat well.
3. Combine flour, oats, baking soda, and salt in a medium bowl, stirring with a whisk. Add flour mixture to banana mixture in bowl; beat with mixer until well blended. Stir in chocolate chips.
4. Drop batter by heaping tablespoonfuls 2 inches apart onto baking sheets coated with cooking spray. Baking at 350 for 18 minutes. Cool on pans 2 minutes. Yield: 2 dozen.
This cookie is so yummy and somewhat healthy, hope you love it too!
Thursday, July 9, 2009
Goat Cheese Please

A current obsession:
Goat Cheese.
Goat Cheese.
I want it on everything and this has led to a recent lunch creation that I have craved each day since the first day I made it. The total time it takes to make it is as long as it takes your noodles to boil (8 min?).
Barilla Multigrain Plus Thin Spaghetti (don't know why, it really does taste better in this dish than regular white flour pasta)
handful of grape or cherry tomatoes
garlic
fresh basil
olive oil
goat cheese
handful of grape or cherry tomatoes
garlic
fresh basil
olive oil
goat cheese
First I boil water and cook the pasta (and I always add salt to the water). While the pasta is boiling, I heat up some olive oil in a pan and put a little goat cheese on the bottom of the bowl I will serve in. Once the oil in the pan is hot, I add in the tomatoes (which I halved) with a little salt. After they get good and hot, I add a little crushed garlic and my basil and toss it around. After another thirty seconds or so, its ready. I drain my noodles and put them in my goat cheesey bowl, throw my tomato basil concoction on top of the pasta and then fork a few (or a lot...) of goat cheese crumbles on top. Salt to taste. Its amazing (and healthy/super filling).
Subscribe to:
Posts (Atom)
